
Contents 非表示
はじめに
最近Android学習サボってたので、復習がてらHiltの概念を理解する。
今回の構成
Hilt & Jetpack Compose & MVVM
実行環境:
- Android Studio Ladybug | 2024.2.1 Patch 1
- macOS,Tahoe (26.1) ※Apple Silicon
- JDK,17 (Microsoft OpenJDK)
- Gradle,8.9
- Kotlin,2.0.0
実装
ファイル構成
今回のプロジェクト名: MyWeather2026
myweather2026/
├── build.gradle
├── settings.gradle
├── app/
│   ├── build.gradle
│   └── src/
│       └── main/
│           ├── AndroidManifest.xml
│           ├── java/com/example/weatherapp/
│           │   ├── WeatherApp.kt                  // @HiltAndroidApp
│           │   ├── MainActivity.kt                  // @AndroidEntryPoint (エントリーポイント)
│           │
│           │   ├── di/
│           │   │   └── WeatherModule.kt               // Hilt Module
│           │
│           │   ├── data/
│           │   │   ├── remote/
│           │   │   │   ├── OpenWeatherApiService.kt   // Retrofit API定義
│           │   │   │   └── WeatherResponse.kt          // APIレスポンスDTO
│           │   │   └── repository/
│           │   │       └── WeatherRepositoryImpl.kt // Repository実装
│           │
│           │   ├── domain/
│           │   │   ├── repository/
│           │   │   │   └── WeatherRepository.kt   // Repositoryインターフェース
│           │
│           │   ├── presentation/
│           │   │   ├── viewmodel/
│           │   │   │   └── WeatherViewModel.kt    // ViewModel
│           │   │   ├── ui/
│           │   │   │   ├── WeatherScreen.kt       // メイン画面
│           │   │   │   └── WeatherCard.kt         // 天気カード表示UI
※ OpenWeatherのAPIKeyを使用するので、事前に取得してください。
必要な依存系インストール
libs.versions.toml:
[versions]
agp = "8.7.1"
kotlin = "2.0.0"
coreKtx = "1.15.0"
junit = "4.13.2"
junitVersion = "1.3.0"
espressoCore = "3.7.0"
lifecycleRuntimeKtx = "2.10.0"
activityCompose = "1.10.0"
composeBom = "2024.04.01"
# 追加 -- ここから
hilt = "2.51.1"
hiltNavigationCompose = "1.2.0"
retrofit = "2.11.0"
okhttp = "4.12.0"
serialization = "1.6.3"
composeIcons = "1.7.0"
# 追加 -- ここまで

[libraries]
androidx-core-ktx = { group = "androidx.core", name = "core-ktx", version.ref = "coreKtx" }
junit = { group = "junit", name = "junit", version.ref = "junit" }
androidx-junit = { group = "androidx.test.ext", name = "junit", version.ref = "junitVersion" }
androidx-espresso-core = { group = "androidx.test.espresso", name = "espresso-core", version.ref = "espressoCore" }
androidx-lifecycle-runtime-ktx = { group = "androidx.lifecycle", name = "lifecycle-runtime-ktx", version.ref = "lifecycleRuntimeKtx" }
androidx-activity-compose = { group = "androidx.activity", name = "activity-compose", version.ref = "activityCompose" }
androidx-compose-bom = { group = "androidx.compose", name = "compose-bom", version.ref = "composeBom" }
androidx-ui = { group = "androidx.compose.ui", name = "ui" }
androidx-ui-graphics = { group = "androidx.compose.ui", name = "ui-graphics" }
androidx-ui-tooling = { group = "androidx.compose.ui", name = "ui-tooling" }
androidx-ui-tooling-preview = { group = "androidx.compose.ui", name = "ui-tooling-preview" }
androidx-ui-test-manifest = { group = "androidx.compose.ui", name = "ui-test-manifest" }
androidx-ui-test-junit4 = { group = "androidx.compose.ui", name = "ui-test-junit4" }
androidx-material3 = { group = "androidx.compose.material3", name = "material3" }
# 追加 -- ここから
# Hilt
hilt-android = { group = "com.google.dagger", name = "hilt-android", version.ref = "hilt" }
hilt-compiler = { group = "com.google.dagger", name = "hilt-android-compiler", version.ref = "hilt" }
androidx-hilt-navigation-compose = { group = "androidx.hilt", name = "hilt-navigation-compose", version.ref = "hiltNavigationCompose" }

# Retrofit & OkHttp
retrofit = { group = "com.squareup.retrofit2", name = "retrofit", version.ref = "retrofit" }
retrofit-serialization = { group = "com.jakewharton.retrofit", name = "retrofit2-kotlinx-serialization-converter", version = "1.0.0" }
okhttp-logging = { group = "com.squareup.okhttp3", name = "logging-interceptor", version.ref = "okhttp" }

# Kotlin Serialization (JSONパース用)
kotlinx-serialization-json = { group = "org.jetbrains.kotlinx", name = "kotlinx-serialization-json", version.ref = "serialization" }

# アイコン
androidx-compose-material-icons-extended = { group = "androidx.compose.material", name = "material-icons-extended", version.ref = "composeIcons" }
# 追加 -- ここまで

[plugins]
android-application = { id = "com.android.application", version.ref = "agp" }
kotlin-android = { id = "org.jetbrains.kotlin.android", version.ref = "kotlin" }
kotlin-compose = { id = "org.jetbrains.kotlin.plugin.compose", version.ref = "kotlin" }
# 追加 -- ここから
hilt = { id = "com.google.dagger.hilt.android", version.ref = "hilt" }
kotlin-serialization = { id = "org.jetbrains.kotlin.plugin.serialization", version.ref = "kotlin" }
# 追加 -- ここまで
build.gradle.kts (モジュール):
plugins {
    alias(libs.plugins.android.application)
    alias(libs.plugins.kotlin.android)
    alias(libs.plugins.kotlin.compose)
    // 追加 -- ここから
    alias(libs.plugins.hilt)
    alias(libs.plugins.kotlin.serialization)
    id("kotlin-kapt") // Hiltに必要
    // 追加 -- ここまで
}

android {
    namespace = "com.example.myweather2026"
    compileSdk = 36

    defaultConfig {
        applicationId = "com.example.myweather2026"
        minSdk = 24
        targetSdk = 36
        versionCode = 1
        versionName = "1.0"

        testInstrumentationRunner = "androidx.test.runner.AndroidJUnitRunner"
    }

    buildTypes {
        release {
            isMinifyEnabled = false
            proguardFiles(
                getDefaultProguardFile("proguard-android-optimize.txt"),
                "proguard-rules.pro"
            )
        }
    }
    compileOptions {
        sourceCompatibility = JavaVersion.VERSION_11
        targetCompatibility = JavaVersion.VERSION_11
    }
    kotlinOptions {
        jvmTarget = "11"
    }
    buildFeatures {
        compose = true
    }
}

dependencies {

    implementation(libs.androidx.core.ktx)
    implementation(libs.androidx.lifecycle.runtime.ktx)
    implementation(libs.androidx.activity.compose)
    implementation(platform(libs.androidx.compose.bom))
    implementation(libs.androidx.ui)
    implementation(libs.androidx.ui.graphics)
    implementation(libs.androidx.ui.tooling.preview)
    implementation(libs.androidx.material3)
    testImplementation(libs.junit)
    androidTestImplementation(libs.androidx.junit)
    androidTestImplementation(libs.androidx.espresso.core)
    androidTestImplementation(platform(libs.androidx.compose.bom))
    androidTestImplementation(libs.androidx.ui.test.junit4)
    debugImplementation(libs.androidx.ui.tooling)
    debugImplementation(libs.androidx.ui.test.manifest)

    // 追加 -- ここから
    // Hilt
    implementation(libs.hilt.android)
    kapt(libs.hilt.compiler)
    implementation(libs.androidx.hilt.navigation.compose)

    // Networking
    implementation(libs.retrofit)
    implementation(libs.retrofit.serialization)
    implementation(libs.okhttp.logging)
    implementation(libs.kotlinx.serialization.json)
    implementation(libs.androidx.compose.material.icons.extended)
    // 追加 -- ここまで
}
build.gradle.kts (アプリ全体):
plugins {
    alias(libs.plugins.android.application) apply false
    alias(libs.plugins.kotlin.android) apply false
    alias(libs.plugins.kotlin.compose) apply false
    // 追加 -- ここから
    alias(libs.plugins.hilt) apply false
    alias(libs.plugins.kotlin.serialization) apply false
    // 追加 -- ここまで
}
全部入れ終わったらsync、Rebuild Projectをしてエラーにならないことを確認。
WeatherApp & AppModule & MainActivity
WeatherApp (アプリの入り口となる部分):
package com.example.myweather2026

import android.app.Application
import dagger.hilt.android.HiltAndroidApp

@HiltAndroidApp // Hiltにここが入口やぞって伝える役割
class WeatherApp : Application()
Manifest.xmlには以下を追加しておく👇
<uses-permission android:name="android.permission.INTERNET" /> // 通信許可

<application
        android:name=".WeatherApp" // 入り口
OpenWeatherModule (DIの核となる部分):
package com.example.myweather2026.di

import com.example.myweather2026.data.api.OpenWeatherApiService
import com.example.myweather2026.data.repository.WeatherRepositoryImpl
import com.example.myweather2026.domain.repository.WeatherRepository
import com.jakewharton.retrofit2.converter.kotlinx.serialization.asConverterFactory
import dagger.Binds
import dagger.Module
import dagger.Provides
import dagger.hilt.InstallIn
import dagger.hilt.components.SingletonComponent
import kotlinx.serialization.json.Json
import okhttp3.MediaType.Companion.toMediaType
import retrofit2.Retrofit
import javax.inject.Singleton

@Module
@InstallIn(SingletonComponent::class) // アプリ全体でインスタンスを共有
abstract class WeatherModule {

    @Binds
    @Singleton
    abstract fun bindWeatherRepository(
        impl: WeatherRepositoryImpl
    ): WeatherRepository

    companion object {
        @Provides
        @Singleton
        fun provideNetworkJson(): Json = Json {
            ignoreUnknownKeys = true // APIレスポンスに定義外のキーが含まれていても無視
        }

        @Provides
        @Singleton
        fun provideOpenWeatherApi(json: Json): OpenWeatherApiService {
            return Retrofit.Builder()
                .baseUrl("https://api.openweathermap.org/")
                .addConverterFactory(json.asConverterFactory("application/json".toMediaType()))
                .build()
                .create(OpenWeatherApiService::class.java)
        }
    }
}MainActivity:
package com.example.myweather2026
import android.os.Bundle
import androidx.activity.ComponentActivity
import androidx.activity.compose.setContent
import androidx.activity.enableEdgeToEdge
import androidx.compose.foundation.layout.Box
import androidx.compose.foundation.layout.fillMaxSize
import androidx.compose.foundation.layout.padding
import androidx.compose.material3.MaterialTheme
import androidx.compose.material3.Scaffold
import androidx.compose.ui.Modifier
import com.example.myweather2026.ui.theme.weather.WeatherScreen
import dagger.hilt.android.AndroidEntryPoint

@AndroidEntryPoint
class MainActivity : ComponentActivity() {
    override fun onCreate(savedInstanceState: Bundle?) {
        super.onCreate(savedInstanceState)
        enableEdgeToEdge()
        setContent {
            MaterialTheme {
                Scaffold(
                    modifier = Modifier.fillMaxSize()
                ) { innerPadding ->
                    Box(modifier = Modifier.padding(innerPadding)) {
                        WeatherScreen()
                    }
                }
            }
        }
    }
}
各ファイルはまだ作ってないのでエラーになりますがこれから作っていくので一旦無視でOKです。
OpenWeatherApiService、WeatherResponse
WeatherApiService:
package com.example.myweather2026.data.api

import com.example.myweather2026.data.model.WeatherResponse
import retrofit2.http.GET
import retrofit2.http.Query

interface OpenWeatherApiService {
    @GET("data/2.5/weather")
    suspend fun getCurrentWeather(
        @Query("q") city: String,
        @Query("appid") apiKey: String,
        @Query("units") units: String = "metric",
        @Query("lang") lang: String = "ja"
    ): WeatherResponse
}WeatherResponse:
package com.example.myweather2026.data.model

import kotlinx.serialization.SerialName
import kotlinx.serialization.Serializable

@Serializable
data class WeatherResponse(
    @SerialName("name") val cityName: String,
    @SerialName("main") val main: Main,
    @SerialName("weather") val weather: List<Weather>
)

@Serializable
data class Main(val temp: Double)

@Serializable
data class Weather(val description: String)
WeatherRepository, WeatherRepositoryImpl
WeatherRepository (大元のルール決めを記載する場所):
package com.example.myweather2026.domain.repository

import com.example.myweather2026.data.model.WeatherResponse

interface WeatherRepository {
    suspend fun getCurrentWeather(city: String): Result<WeatherResponse>
}
WeatherRepositoryImpl (実際に具体的な処理を書く場所):
package com.example.myweather2026.data.repository

import com.example.myweather2026.data.api.OpenWeatherApiService
import com.example.myweather2026.data.model.WeatherResponse
import com.example.myweather2026.domain.repository.WeatherRepository
import javax.inject.Inject

class WeatherRepositoryImpl @Inject constructor(
    private val api: OpenWeatherApiService
) : WeatherRepository {
    override suspend fun getCurrentWeather(city: String): Result<WeatherResponse> {
        /**
         * 天気データを取得する
         * * [runCatching] を使う理由:
         * 1. Retrofitの通信例外(IOException等)をResult型でラップし、アプリがクラッシュするのを防ぐ
         * 2. ViewModel側で try-catch を書かせず、関数型の流儀(onSuccess/onFailure)で
         * エラーハンドリングを強制できる
         */
        return runCatching { api.getCurrentWeather(city, "API_KEY") } // 本番ではBuildConfigから持ってくるとかがGood
    }
}
WeatherViewModel
package com.example.myweather2026.ui.theme.weather

import androidx.lifecycle.ViewModel
import androidx.lifecycle.viewModelScope
import com.example.myweather2026.data.model.WeatherResponse
import com.example.myweather2026.domain.repository.WeatherRepository
import dagger.hilt.android.lifecycle.HiltViewModel
import kotlinx.coroutines.flow.MutableStateFlow
import kotlinx.coroutines.flow.StateFlow
import kotlinx.coroutines.flow.asStateFlow
import kotlinx.coroutines.launch
import javax.inject.Inject

// 画面の状態を表す密封クラス(Sealed Class)
sealed class WeatherUiState {
    object Loading : WeatherUiState()
    data class Success(val weather: WeatherResponse): WeatherUiState()
    data class Error(val message: String) : WeatherUiState()
}

@HiltViewModel
class WeatherViewModel @Inject constructor(
    private val repository: WeatherRepository // Hiltによって自動注入
) : ViewModel() {

    private val _uiState = MutableStateFlow<WeatherUiState>(WeatherUiState.Loading)
    val uiState: StateFlow<WeatherUiState> = _uiState.asStateFlow()

    init {
        getWeather("Tokyo") // 初回起動はデフォルトで東京
    }

    fun getWeather(city: String) {
        viewModelScope.launch {
            _uiState.value = WeatherUiState.Loading
            // Result型をそのまま扱い、成功・失敗のコールバックで状態を分ける
            repository.getCurrentWeather(city)
                .onSuccess { response ->
                    _uiState.value = WeatherUiState.Success(response)
                }
                .onFailure { e ->
                    _uiState.value = WeatherUiState.Error(e.localizedMessage ?: "Unknown error")
                }
        }
    }
}
WeatherScreen, WeatherCard
WeatherScreen (メイン画面):
package com.example.myweather2026.ui.theme.weather
import androidx.compose.foundation.layout.Arrangement
import androidx.compose.foundation.layout.Column
import androidx.compose.foundation.layout.Row
import androidx.compose.foundation.layout.fillMaxSize
import androidx.compose.foundation.layout.fillMaxWidth
import androidx.compose.foundation.layout.padding
import androidx.compose.material3.Button
import androidx.compose.material3.CircularProgressIndicator
import androidx.compose.material3.OutlinedTextField
import androidx.compose.material3.Text
import androidx.compose.runtime.Composable
import androidx.compose.runtime.collectAsState
import androidx.compose.runtime.getValue
import androidx.compose.runtime.mutableStateOf
import androidx.compose.runtime.remember
import androidx.compose.runtime.setValue
import androidx.compose.ui.Alignment
import androidx.compose.ui.Modifier
import androidx.compose.ui.graphics.Color
import androidx.compose.ui.unit.dp
import androidx.hilt.navigation.compose.hiltViewModel
@Composable
fun WeatherScreen(viewModel: WeatherViewModel = hiltViewModel()) {
val uiState by viewModel.uiState.collectAsState()
var cityName by remember { mutableStateOf("") }
Column(
modifier = Modifier
.fillMaxSize()
.padding(16.dp),
horizontalAlignment = Alignment.CenterHorizontally,
verticalArrangement = Arrangement.spacedBy(16.dp)
) {
Row(
modifier = Modifier.fillMaxWidth(),
verticalAlignment = Alignment.CenterVertically,
horizontalArrangement = Arrangement.spacedBy(8.dp)
) {
OutlinedTextField(
value = cityName,
onValueChange = { cityName = it },
label = { Text("Enter City") },
modifier = Modifier.weight(1f),
singleLine = true
)
Button(
onClick = { viewModel.getWeather(cityName) },
// Disable button if loading or text is empty
enabled = uiState !is WeatherUiState.Loading && cityName.isNotBlank()
) {
Text("Search")
}
}
// Content Section
when (val state = uiState) {
is WeatherUiState.Loading -> {
CircularProgressIndicator(modifier = Modifier.padding(top = 32.dp))
}
is WeatherUiState.Success -> {
WeatherCard(state.weather)
}
is WeatherUiState.Error -> {
Text(
text = state.message,
color = Color.Red,
modifier = Modifier.padding(top = 16.dp)
)
}
}
}
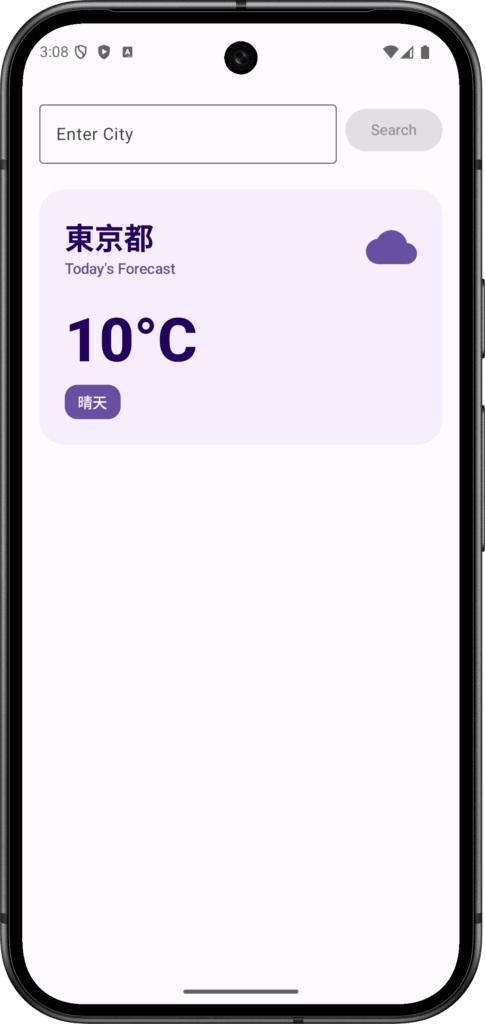
}WeatherCard (カードUI):
package com.example.myweather2026.ui.theme.weather

import androidx.compose.foundation.layout.Arrangement
import androidx.compose.foundation.layout.Column
import androidx.compose.foundation.layout.Row
import androidx.compose.foundation.layout.Spacer
import androidx.compose.foundation.layout.fillMaxWidth
import androidx.compose.foundation.layout.height
import androidx.compose.foundation.layout.padding
import androidx.compose.foundation.layout.size
import androidx.compose.foundation.shape.RoundedCornerShape
import androidx.compose.material.icons.Icons
import androidx.compose.material.icons.rounded.Cloud
import androidx.compose.material3.Card
import androidx.compose.material3.CardDefaults
import androidx.compose.material3.Icon
import androidx.compose.material3.MaterialTheme
import androidx.compose.material3.Surface
import androidx.compose.material3.Text
import androidx.compose.runtime.Composable
import androidx.compose.ui.Alignment
import androidx.compose.ui.Modifier
import androidx.compose.ui.text.font.FontWeight
import androidx.compose.ui.unit.dp
import com.example.myweather2026.data.model.WeatherResponse

@Composable
fun WeatherCard(weather: WeatherResponse) {
    Card(
        modifier = Modifier
            .fillMaxWidth()
            .padding(vertical = 8.dp),
        shape = RoundedCornerShape(24.dp),
        colors = CardDefaults.cardColors(
            containerColor = MaterialTheme.colorScheme.primaryContainer.copy(alpha = 0.4f)
        ),
        elevation = CardDefaults.cardElevation(defaultElevation = 0.dp)
    ) {
        Column(
            modifier = Modifier
                .padding(24.dp)
                .fillMaxWidth(),
            horizontalAlignment = Alignment.Start // Leading alignment
        ) {
            Row(
                modifier = Modifier.fillMaxWidth(),
                horizontalArrangement = Arrangement.SpaceBetween,
                verticalAlignment = Alignment.CenterVertically
            ) {
                Column {
                    Text(
                        text = weather.cityName,
                        style = MaterialTheme.typography.headlineMedium,
                        fontWeight = FontWeight.Bold,
                        color = MaterialTheme.colorScheme.onPrimaryContainer
                    )
                    Text(
                        text = "Today's Forecast",
                        style = MaterialTheme.typography.labelLarge,
                        color = MaterialTheme.colorScheme.onPrimaryContainer.copy(alpha = 0.7f)
                    )
                }
                // Placeholder for an icon - you can swap with Coil later
                Icon(
                    imageVector = Icons.Rounded.Cloud,
                    contentDescription = null,
                    modifier = Modifier.size(48.dp),
                    tint = MaterialTheme.colorScheme.primary
                )
            }

            Spacer(modifier = Modifier.height(24.dp))

            Text(
                text = "${weather.main.temp.toInt()}°C",
                style = MaterialTheme.typography.displayLarge,
                fontWeight = FontWeight.ExtraBold,
                color = MaterialTheme.colorScheme.onPrimaryContainer
            )

            Spacer(modifier = Modifier.height(8.dp))

            Surface(
                color = MaterialTheme.colorScheme.primary,
                shape = RoundedCornerShape(12.dp)
            ) {
                Text(
                    text = weather.weather.firstOrNull()?.description ?: "",
                    modifier = Modifier.padding(horizontal = 12.dp, vertical = 6.dp),
                    style = MaterialTheme.typography.labelLarge,
                    color = MaterialTheme.colorScheme.onPrimary
                )
            }
        }
    }
}
Navigation系
今回は不要ですが、天気詳細画面など作りたい時の土台として。
AppNavigation(ナビゲーション管理):
@Composable
fun AppNavigation(navController: NavHostController = rememberNavController()) {
	NavHost(
		navController = navController,
		startDestination = "weather"
	) {
		composable("weather") {
			WeatherScreen()
		}

		// 今後ここに遷移先追加とかすればOK
	}
}
MainActivity (エントリーポイント):
@AndroidEntryPoint
class MainActivity : ComponentActivity() {
	override fun onCreate(savedInstanceState: Bundle?) {
		super.onCreate(savedInstanceState)
		setContent {
			MaterialTheme {
				Surface(color = MaterialTheme.colorScheme.background) {
					AppNavigation()
				}
			}
		}
	}
}
エミューレータ or 実機で実行、検索クエリの地域の天気情報がカードで表示されたらOK。
Hilt & MVVM データフロー
ざっくりとこんな感じ:
WeatherScreen (UI)
     ↑ (State: WeatherUiStateを監視)
WeatherViewModel
     ↑ (Result<WeatherResponse>を返す)
WeatherRepository (interface)
     ↑
WeatherRepositoryImpl (実装)
     ↑ (JSONレスポンス)
OpenWeatherApi (Retrofit)
     ↑ (HTTP Request)
OpenWeather API
まとめ:Hiltを使うときのチェックポイント
1: @HiltAndroidApp を Application クラスにつけること
- HiltのDIコンテナを初期化する“玄関口”
AndroidManifest.xmlにandroid:name=".YourApp"を忘れずに
2: 依存性は @Module + @Provides or @Inject で定義
- どこで何を注入するかは明示的に書く
- Hiltはコンパイル時に依存関係を解析&コード生成してくれる
3: @InstallIn でスコープ(範囲)を指定
- どこで何を注入するかは明示的に書く
- 他にも
ViewModelComponent,ActivityComponentなど目的に応じて使い分け
4: ViewModelは @HiltViewModel + @Inject constructor(...)
hiltViewModel()で簡単に呼び出せる、便利- 内部のUseCaseもHiltが自動で注入してくれるからスッキリする
5: デバッグ・テスト時は Fake を差し替えられる構成にしておく
interface+@Provides構成にしておくと、MockやTestModuleに切り替えやすい- テストでは
@TestInstallIn+replacesで差し替えがスマート